You don’t have to wait for something to go wrong before you take a careful look at your home. Maybe you’ve noticed the bathroom feels a little less certain in the mornings. Maybe a family member has started asking questions you’re not sure how to answer. Or maybe you’re simply the kind of person who plans ahead, and you want to know exactly where your home stands before it becomes an issue.
We will walk you through a complete aging in place home assessment, room by room, from the front door to the bedroom. By the time you finish, you’ll have a clear picture of what’s working, what needs attention, and what can wait. The whole process takes about 60 to 90 minutes. You can do it yourself, with a family member, or use it as preparation before a professional assessment.
Before you start: If you have had a fall in the past 12 months, tell your doctor before making changes independently. Some falls signal underlying balance or strength issues that a home modification alone won’t fix, and a professional evaluation will serve you better than a checklist.
For the full picture of aging-in-place planning, including finances, care, technology, and legal documents, see our complete guide to aging in place.
What You Will Need
Gather these before you begin. Having them in hand means you won’t stop mid-assessment to look for something.
Essential:
- This checklist (print it or keep it open on a tablet)
- A notepad and pen or your phone’s notes app to log findings
- A tape measure (for doorways, hallways, and turning spaces)
- A flashlight or phone torch (for poorly lit areas and under-sink spaces)
- Comfortable shoes with non-slip soles, as you’ll be walking through every room
Helpful but optional:
- A second person – a family member or caregiver who can note findings while you move through the space
- A camera or phone to photograph problem areas for later reference or for sharing with a contractor
- Our free Aging in Place Planning Checklist provides a printable version of this room-by-room format
If you’re doing a deeper structural review:
- Basic stud finder (to assess walls where grab bars may be needed)
- A level (for checking ramp or threshold slopes)
Step-by-Step Aging in Place Home Assessment (Room-by-Room)
Step 1: Start Outside – Evaluate Your Entry Points
Begin at the front door and every door you use regularly, including the garage entry and any back or side doors.
Walk from where you park or exit a vehicle all the way to each entry door. Move at a normal pace and pay attention to anything that gives you pause.
Check for:
- Uneven pavement, cracked walkways, or raised edges where a toe could catch
- Steps at the entry – how many, how steep, whether they have a railing on at least one side
- Whether there is any zero-step entry option into the home – even one accessible entry point matters enormously
- Adequate lighting – can you see clearly at night? Is there motion-activated lighting?
- The door handle itself – round knobs require grip and twisting; lever handles do not
- The door threshold – is there a raised lip that could catch a walker or cane?
Measure: If you use or anticipate using a walker or wheelchair, exterior doorways should be at least 32 inches clear; 36 inches is the universal design standard.
What good looks like: You can walk from your vehicle to your door without stepping over anything, gripping anything for balance, or navigating poor lighting.
Caution: Exterior steps without a railing on at least one side are among the highest fall-risk features of any home. Flag this as a priority if it applies.
Step 2: Assess the Main Living Areas
Walk through your living room, dining room, and any main-floor rooms you use daily.
This is your aging in place home assessment – room-by-room home safety checklist for seniors in action. Look at each space as if you’re seeing it for the first time.
Check for:
- Loose area rugs or rugs without non-slip backing, these are the single most common trip hazard in homes
- Electrical or lamp cords crossing walking paths
- Furniture arranged in a way that narrows pathways below 36 inches
- Low-profile furniture (coffee tables, ottomans) that is hard to see and easy to strike with a foot
- Chairs and sofas: are they high enough to sit down and stand up from without significant effort? Seat height of 18–20 inches with armrests is the functional standard
- Lighting levels, is every area adequately lit, including at floor level? Dark corners and dim hallways create hazards even in familiar spaces
Measure: Walk the route you take most often – living room to kitchen, living room to bathroom. Is there a clear 36-inch path throughout?
What good looks like: You can move through every main room without stepping around furniture, over cords, or across an unsecured rug.
Important: Remove or properly secure loose rugs today, before anything else. This step costs nothing and prevents more falls than almost any other single action.
Step 3: Evaluate the Kitchen
Stand in the center of your kitchen and think through every task you do there regularly.
The goal is not a showroom kitchen. It’s a kitchen where you can prepare meals safely, without overhead reaching, deep bending, or surfaces that create slip risk.
Check for:
- Items you use daily, stored above shoulder height or below knee height, as both require movements that increase fall risk
- The cooktop controls: are they at the front or side, or do they require reaching over a burner?
- Flooring: is it non-slip? Are there mats in front of the sink or stove? Unsecured mats are trip hazards, so remove them or replace them with non-slip versions secured at all edges
- Cabinet hardware: round knobs require grip strength; D-ring pulls and bar handles do not
- Under-sink space: is it accessible and clear, or cluttered with items that make it difficult to use the space efficiently?
- Lighting over every work surface, as inadequate task lighting, is a knife and burn hazard
What good looks like: Everything you use daily is reachable without stepping on a stool, bending below the knee, or reaching overhead. Surfaces are clean, dry, and well-lit.
Caution: If you use a step stool regularly in the kitchen, it is a fall risk that home reorganization, not better balance, should eliminate.
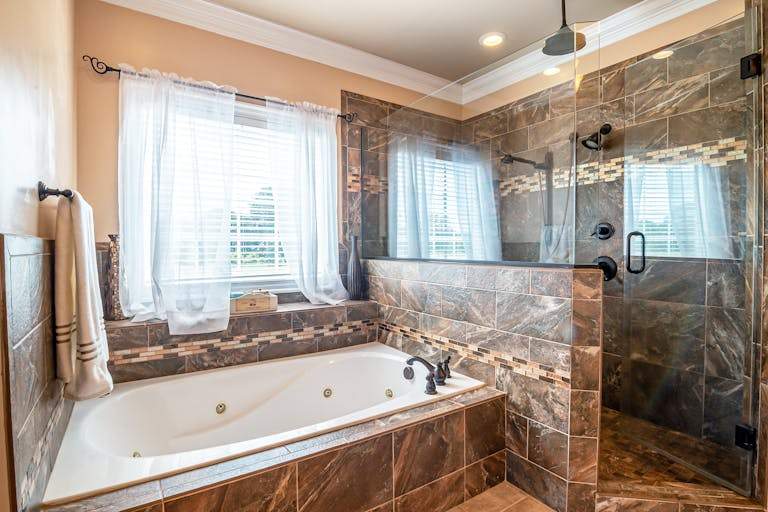
Step 4: Conduct Your Bathroom Assessment Most Carefully
The bathroom should be the most thorough part of your aging in place home safety checklist. According to the CDC, the bathroom accounts for a disproportionate share of the 36 million falls experienced by older adults in the U.S. each year.
Do this assessment slowly and honestly.
Check for:
- The shower or tub entry: is there a step-over threshold? How high is it? Can you step over it steadily, every time, including when tired or in poor light?
- Grab bars: are there grab bars inside the shower or tub area? Beside the toilet? If there are none, this is the highest priority modification in the home.
- The toilet height: standard toilets are 15 inches. A comfort-height toilet at 17–19 inches is significantly easier to sit down on and stand up from for most adults 60 and older.
- For the bathroom floor and the tub or shower floor, is the flooring non-slip? Wet tile is one of the most dangerous surfaces in any home.
- Faucet controls: single-lever controls are easier to manage than separate hot and cold handles
- The vanity and mirror: can you use them comfortably while seated if you needed to?
- Lighting: is the bathroom well-lit at night? A nightlight between the bedroom and bathroom is a simple, high-value addition.
Measure: There should be at least 18 inches of clear floor space beside the toilet for a side approach. For a wheelchair or walker, 36 inches is the functional standard.
What good looks like: You can enter, use, and exit the shower and toilet without gripping the towel bar (which is not load-bearing and will not hold your weight in a fall), and without stepping over a threshold that requires significant leg lift.
Caution: Towel bars are not grab bars. They are not anchored to hold a person’s weight and will pull away from the wall. If you currently rely on a towel bar for support, installing a proper grab bar in that location is urgent.
Step 5: Assess Every Staircase in the Home
If your home has stairs in the interior or exterior, give each staircase its own evaluation.
This applies to a full flight to a second floor, a split-level step or two, or basement stairs you use for the washer and dryer.
Check for:
- Handrails: Is there a railing on at least one side? On both sides? Railings should run the full length of the staircase and be graspable. Round rails of 1.25 to 1.5 inches in diameter are easiest to grip.
- Tread surface: are the stair treads in good condition? Non-slip? No loose carpet edges?
- Lighting: is the staircase well-lit from top to bottom? Is there a light switch at both the top and the bottom?
- Step depth and height: shallow treads or uneven riser heights significantly increase fall risk
- Items stored on stairs, even temporarily, are a serious hazard
What good looks like: You can ascend and descend the full staircase holding the railing, without the railing wobbling, with clear footing on each step.
Important: If you avoid using a staircase in your home because it feels unsafe, that is important information. Document it and address it, either through modification or by reorganizing your living so that the unsafe staircase is no longer part of your daily routine.
Step 6: Evaluate the Bedroom
Assess your bedroom with the specific context of nighttime use. When lighting is low, you may be less alert, and the path to the bathroom matters most.
Check for:
- Bed height: sit on the edge of the bed. Your feet should rest flat on the floor and you should be able to stand without pushing up from your hands. If the bed is too low, a bed riser can help; too high, a lower frame or mattress may be needed.
- The path from bed to bathroom: is it clear of furniture, cords, and obstacles? Can you navigate it without full lighting?
- Bedside accessibility: Is there a lamp, a phone, and any medication or alert device within reach from the bed that wouldn’t need you getting up?
- Closet and storage: are items you use daily at a reachable height without stepping on a stool?
- Flooring: any loose rugs, raised thresholds, or uneven surfaces between the bed and the door?
What good looks like: You can get out of bed at 2 a.m. and reach the bathroom safely, without turning on a ceiling light or stepping around anything.
Step 7: Check Lighting Throughout the Entire Home
Make one dedicated pass through every room and hallway, evaluating lighting only.
Poor lighting is implicated in a significant proportion of home falls, and it is one of the lowest-cost, highest-impact improvements available.
Check for:
- Is every room adequately lit for its primary activity?
- Are hallways, especially between the bedroom and bathroom, lit at night? A plug-in nightlight in each hallway and bathroom costs under $10.
- Are light switches at a consistent, reachable height (48 inches is the standard)?
- Are there any areas where you’ve adapted your behavior because the lighting is poor, avoided a room at night, used a flashlight, or moved more slowly? Flag every one of these.
What good looks like: You can move through every part of your home at night without relying on memory of where the furniture is.
✅ Completion Check
Before you finish, confirm:
- Every entry and exit point has been evaluated
- All rooms you use daily have been walked through
- Bathroom grab bar situation has been specifically noted
- All loose rugs and cord hazards have been identified (and ideally removed)
- Staircase railings and lighting have been checked
- Bedroom-to-bathroom nighttime path has been evaluated
- All findings have been written down or photographed

Maintenance Schedule and Reassessment Triggers
An aging in place home assessment is not a one-time event. Plan to repeat it:
- Annually: as a scheduled review, ideally at the same time each year
- After any fall: even a minor one. Falls often reveal hazards that weren’t visible before.
- After any significant health change: a new diagnosis, surgery, a change in medication affecting balance or cognition, or a noticeable change in strength or mobility
- After any home renovation :new flooring, a remodeled bathroom, or any structural change should be reassessed
- When a family member moves in or out: changes in household composition change how the home is used
Signs your home needs reassessment sooner than scheduled:
- You’ve started avoiding a room or area because it feels unsafe
- You’ve had a near-miss – caught yourself on a wall, grabbed a towel bar, stumbled on a rug
- A family member has expressed concern about your safety at home
Common Mistakes and How to Avoid Them
Mistake 1: Evaluating the Home on a Good Day
What it looks like: You do the assessment when you’re feeling strong, well-rested, and alert, and everything seems manageable.
Why it matters: Most falls happen when you’re tired, ill, rushing, or disoriented at night. The relevant question is not “Can I manage this staircase on a Tuesday morning?” It’s “Can I manage this staircase at 11 p.m. when I’m not feeling well?”
Fix it: Walk through your home mentally at your most vulnerable, first thing in the morning before full alertness, late at night, during an illness. Assess for those moments.
Mistake 2: Relying on Towel Bars as Grab Bars
What it looks like: The bathroom has towel bars near the toilet and shower, and they feel solid enough to hold.
Why it matters: Towel bars are anchored to drywall for the weight of towels, not to wall studs for the force of a falling adult. They will pull out of the wall. People are seriously injured every year when the towel bars they were gripping give way.
Fix it: Install grab bars anchored to wall studs or with proper backing. This is a job for a CAPS-certified contractor or a licensed handyman who knows what they’re doing, not a self-adhesive product. See our guide to [home modifications for aging in place] for specific guidance on grab bar installation.
Mistake 3: Treating Area Rugs as Low Priority
What it looks like: The rugs have been there for years, nobody has tripped on them yet, and removing them feels like an overreaction.
Why it matters: Area rugs, especially those with curled edges, without non-slip backing, or on smooth flooring, are the single most common trip hazard in American homes. The National Institute on Aging (NIA) specifically identifies rug removal as one of the highest-priority fall prevention steps.
Fix it: Remove any rug that is not fully secured or does not have a quality non-slip backing. For rugs you want to keep, use double-sided carpet tape on all edges and a non-slip pad underneath.
Mistake 4: Skipping the Nighttime Walk-Through
What it looks like: The assessment covers the home as it looks during the day, well-lit, familiar, and unobstructed.
Why it matters: Nighttime is when many falls happen. Lighting that seems adequate in daylight may be completely insufficient at 2 a.m.
Fix it: After your daytime assessment, do one walk from your bedroom to the bathroom in the dark, or as close to it as feels safe. Note every place where you felt uncertain or had to slow down.
Mistake 5: Assessing for Now Instead of the Next Five to Ten Years
What it looks like: The step-over tub feels manageable right now, so it doesn’t get flagged.
Why it matters: The most effective and cost-effective modifications are made before they’re urgently needed. Making changes during a scheduled kitchen renovation costs a fraction of what it costs to reopen a completed bathroom two years later.
Fix it: For every item that is “manageable now,” ask: Would this still be manageable if my strength or balance declined by 20%? Flag anything that would become a problem with moderate change. Our guide on [how to make a home safe for elderly living alone] covers priority modifications in detail.
When to Get Professional Help Instead
A self-assessment using this checklist is a solid starting point. But certain situations call for a professional evaluation:
- You have a history of falls: more than one fall in the past year, or any fall resulting in injury, warrants a professional OT home assessment
- You or your loved one has a progressive condition: Parkinson’s disease, multiple sclerosis, or moderate to advanced dementia require an assessment tailored to the specific trajectory of that condition
- You’re planning a significant renovation: before spending money on bathroom or kitchen modifications, a CAPS-certified specialist can ensure the money goes to the right places
- Your assessment reveals extensive hazards: if the checklist above surfaces 10 or more items, a professional can help you prioritize what matters most and avoid wasting resources on low-impact changes
A Note for Family Members and Caregivers
If you’re concerned with how to make a home safe for an elderly person living alone, doing this assessment on behalf of or alongside a parent, then a few things are worth knowing.
Do the walk-through together when possible, with your parent moving through their own home at their own pace while you observe and take notes. Watching how someone actually moves through their space reveals hazards that neither a checklist nor a solo observation will catch.
Be specific rather than alarming. “I noticed the bathroom doesn’t have grab bars. Can we talk about adding one?” sounds very different from a general expression of worry about safety. Specificity is less threatening and more actionable.
If your parent is resistant, consider framing the assessment not as a response to decline but as standard good planning, the kind of thing that makes sense at every age. The best time on how to make a home safe for an elderly person living alone is before a fall makes it feel urgent.
For broader guidance on supporting a parent through aging-in-place planning, see our resources on [building a care and support system].
You Now Have Everything You Need
A thorough aging in place home assessment takes less than two hours and gives you more useful information than almost any other single step in your planning. You now know which rooms to evaluate, what to look for in each one, the mistakes most people make, and when to bring in a professional.
The two things most worth remembering: First, remove loose rugs today, before anything else. Second, the bathroom is your highest priority for formal modification. Start there, and the rest of your home will feel much more manageable.
Your next step: Use our free Aging in Place Planning Checklist to turn your findings into a prioritized action plan, with columns for urgency, estimated cost, and who’s responsible for each item.
You’ve just done something genuinely useful for your safety and your independence, and that’s worth a lot.